In today's tutorial we will present how to make a Shoot Colored Light and Water in Photoshop. We will to make this tutorial flash, tripod, color gels and bathtub. So let's have started......
Equipment
Photographing water is a fun indoor activity that can occupy you for a lot of time. It is not very difficult, contrary to what some people believe, and even with a compact camera and integrated flash, handheld, you can get some good photographs. Soon you’ll want to explore further, though, and it is then that a DSLR camera, a tripod and at least one external flash become part of a shopping list.
Some of the most spectacular photographs you will see of water droplets need special equipment, sometimes too expensive for the occasional session, but for many photographs what you need most is patience. You can start with a basic kit and move on to move complicated and expensive gear if your interest grows. But for most of us, just the fun of using what we have is enough.
A macro lens will also help with this project, but it is not essential. A telephoto zoom lens makes for a good alternative.
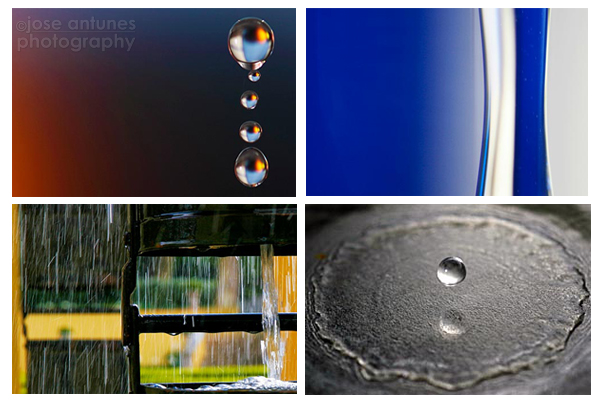
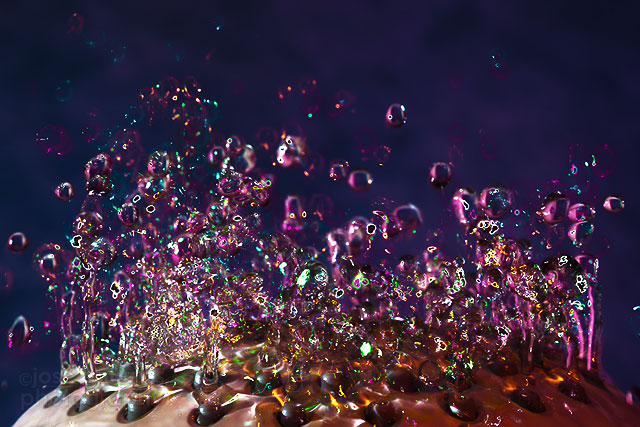
As you may be able to tell from these image, I have a fascination with water and have made many pictures. Some outside exploring fountains, but a lot at home. For most of my shots, my setup is simple: I use the kitchen sink and the water tap, controlling the drip that comes out of it.
Creating Color
For color in the background, I use everything from colored trays to oranges and lemons. As long as they’re out of focus (and with a macro lens this is easy to achieve) it works perfectly.
You can also explore using colored filters on your flash, though this will alter more than the background color. I think the easiest way to play with color is to change your white balance settings. You can create rich blues and deep oranges with a quick adjustment of a camera setting.
My Flash Setup
I mentioned before that you can get good shots using an on-camera flash, but it’s not the easiest thing to do. Being that photography is my profession, I have some gear laying around that makes this whole process easier.
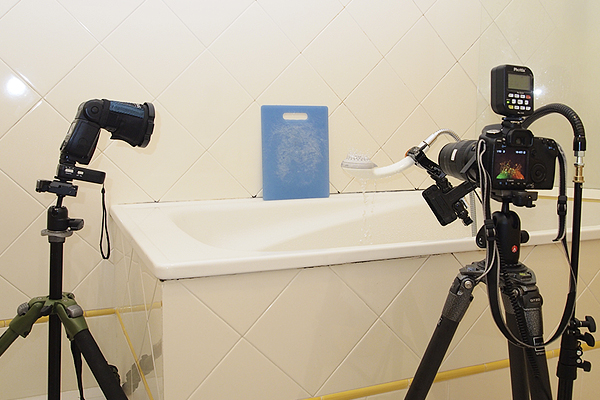
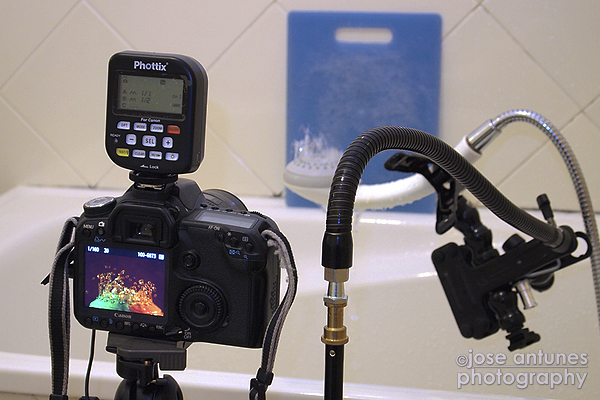
I normally use one flash for this. For the flash, you need a cable to make it possible to move the flash away from the camera and to an angle. I use a radio trigger for the flash, because I am used to it, and the version I use lets me control everything from the camera, what comes in handy in some situations.
You can also use infrared communication if your camera “talks” with an external flash that way. It is better than using a cable, which sometimes is shorter than needed.
I use a radio trigger for the camera as well because it lets me trigger it from any place. Once I have my setup ready, the trigger allows me to work away from the water wear I might cause unwanted vibrations.
Exposure
Step 1
Remember that it is the flash that allows us to freeze the droplets. I usually work with my flash in manual and set the power according to the distance the flash is from the place where the water droplets fall. It can be from 1/8 down to 1/128 depending on the existing conditions.
Step 2
As for the camera I choose a small aperture, from f/11 down, to assure I get a generous area focused.
Step 3
Depending on what I want as the final result, I change shutter speed, from 1/640 to 0.5 seconds. Changing speed gives you control over the ambient light. As you make longer exposures you get interesting effects, from the combination of flash exposure freezing the image and the long exposure creating “ghosts” that look like movement dashes you see in cartoons. Try it!
Step 4
I tend to use 100 ISO most of the time, but with new cameras I have no problems going up to 400 ISO if I feel it gives me more options. Remember you need to use a small aperture to get everything you need in focus.
Step 5
As for focusing, define where your drops fall, and with the camera on the tripod focus on that point (use a small object placed at the exact spot) and check the depth of field to confirm that your chosen aperture will work. Do this with the room lights on and when it is done dim lights so the flash will be the main light source. But do remember you can mix ambient and flash. That’s something I do, and it produces great results.
Shooting
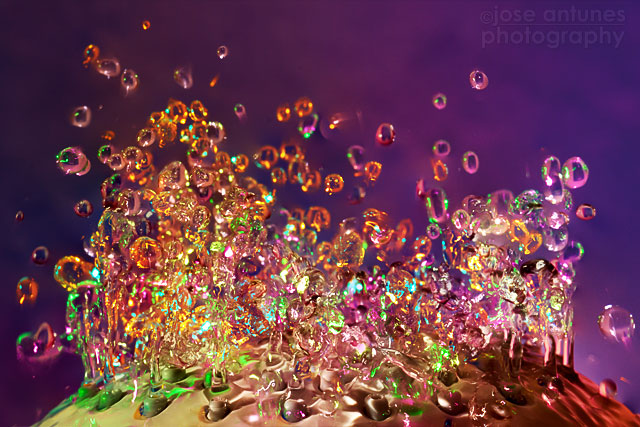
This setup was done in my bathtub (go big or go home) as opposed to the sink, and it took some time to get everything arranged as I wanted it. I decided I wanted to show an inverted shower head photographed with flash and colored gels. It’s not hard to achieve.
Playing with water is always a tricky exercise, both for the photographer and for the viewer. Each person seems to have a different notion of the way things are done.
Let me explain you how I did this. I started by photographing the shower head sequentially with different colored gels over the flash. I tried to work with multiple flashes with gels, but was not happy with the results, so I returned to the simple solution: one flash, multiple exposures, different color gels!
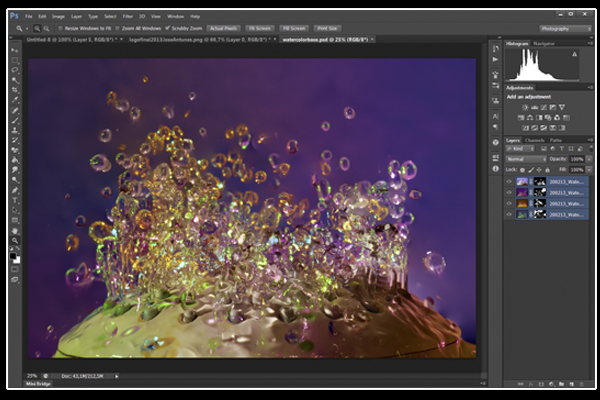
My final image is a composite of several images, each shot with a different color gel on the flash. I’m going to combine them in Photoshop. But it would be interesting to explore this technique by doing multiple in camera exposure. Regardless of the process, you need to keep your camera rock steady between shots. So don’t forget the tripod. Camera movement would make lining up the layer of the image too difficult.
Editing Images
Step 1
Once I captured the images I wanted, I selected them in Adobe Bridge and sent them to Photoshop using the option, on PC, Tools > Photoshop > Load Files into Photoshop Layers.
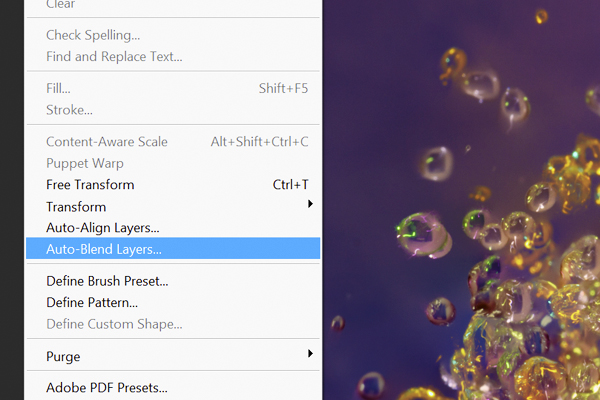
Step 2
Afterwards, I selected all layers in the Layers panel on the right and on the top menu selected Edit > Auto-Blend Layers > Stack Images. Because the images were all taken with a tripod, you do not need to Auto Align Layers before merging them.
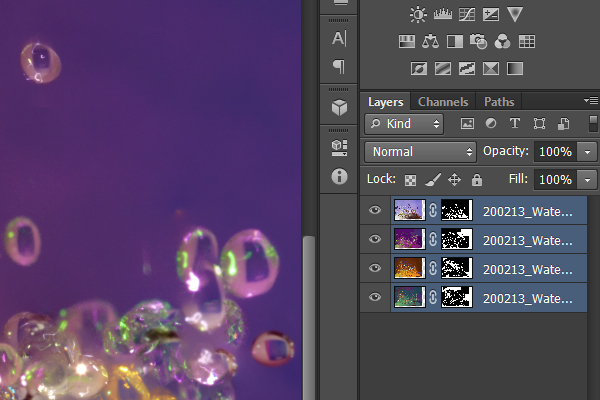
Step 3
The Layers panel on the right side shows – in this case – the four layers, with the masks automatically applied by Photoshop. Open the image to 100% and check that everything registers perfectly. If it does you can merge the image to do the final editing.
Step 4
Before doing so, if you want to be able, in the future, to create multiple images tweaking the layer masks, save the image as a PSD with all layers. Then create a final JPEG or whatever format you want.
Step 5
The process shown here gives you a unique picture that blends different shots into a single image, creating a mixture of colors that could not be achieved if I used multiple flashes with gels. This process makes it not just easier to do but more accessible to most photographers, even with simple equipment.
It is true you do need an editor that lets you merge layers and use masks, but either automatically or manually, most modern programs offer that options. Even free software, as Perfect Effects 4, from onOne Software.

The HDR solution
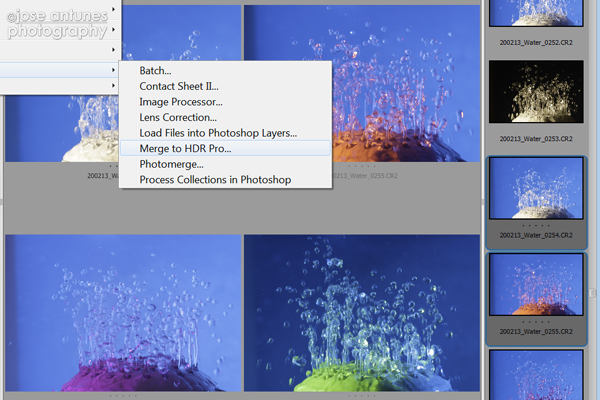
Step 1
There is another way to process the original images, and it will give you a different result. Select the same pictures – or you can go for images taken at different exposures, following the HDR concept, and in Brigde choose Tools>Photoshop>Merge to HDR Pro.
Step 2
In Photoshop, you’ll get the HDR Pro panel, that lets you tweak the aspect of the file. You can activate the suppress ghosts option, but it will probably remove interesting elements of the image, in this particular case. Not doing it will create some areas in the image which seem devoid of any information, but this can be repaired with some cloning work.
Hope you can learn something new from this tutorial.
I feel really glad if you give me feedback through comment below. Soon i am going to show more interesting & innovative tutorials so please keep visit our blog. That’s for now.
Have fun!
Feel free to contact with Clipping Design for clipping path service, image editing service, image masking service or any kind of design support.
Thank you…
Credit:t utsplus.com
one of wonderful tutorials. I like to do image masking service
ReplyDelete